iOS 18 (&17) new Camera APIs
The iOS Camera framework has come a long way baby !!!
iOS 18.0+ || iPadOS 18.0+ || Xcode 16.0+
Let’s explore the new & powerful features that make building photo apps on iOS so much better by looking at the Apple AVCam sample app.
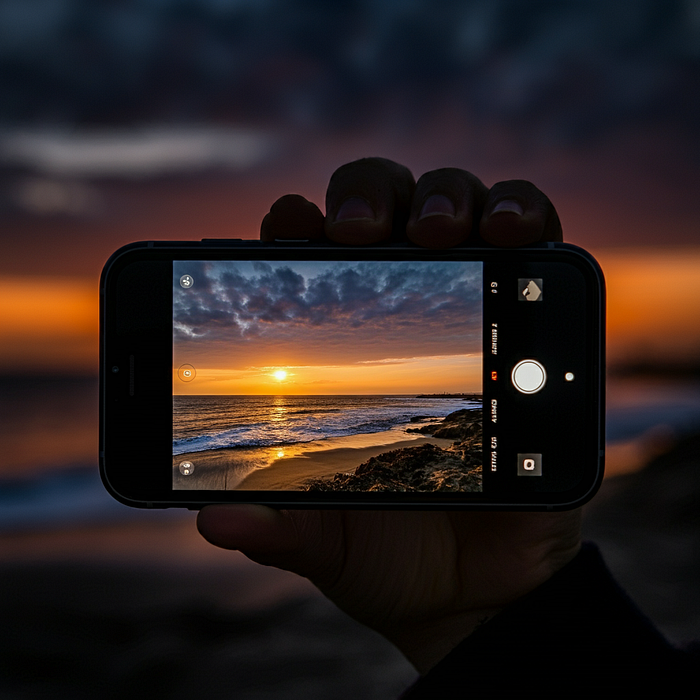
The AVCam: Building a Camera App documentation on Apple’s developer website provides a step-by-step guide to creating a fully functional camera app using the AVFoundation framework. The sample app demonstrates how to capture photos and videos on iOS devices, manage camera settings, and perform real-time camera previews.
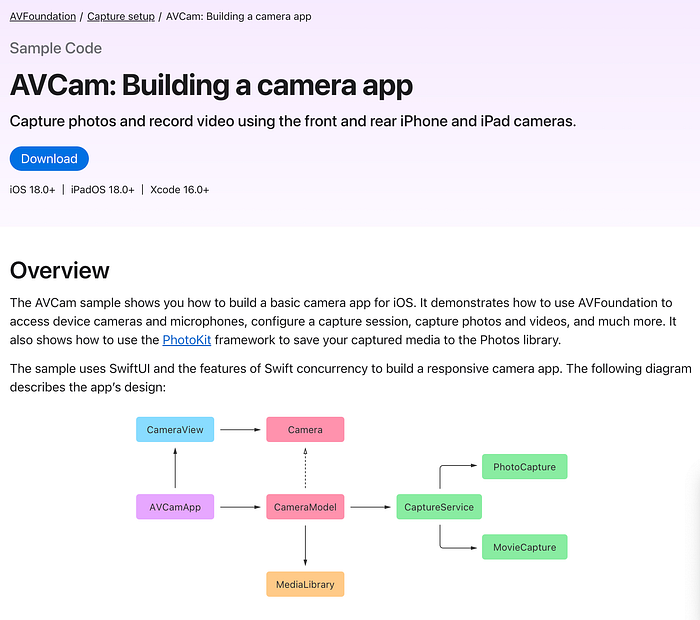
Docs & Source Code:
Key Components and Functionality:
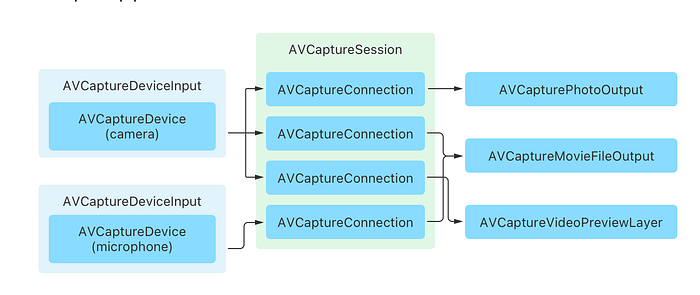
- AVCaptureSession:
AVCam usesAVCaptureSessionto manage the flow of data from input devices (e.g., camera and microphone) to outputs like the preview layer or file outputs. The session coordinates input and output, ensuring smooth capture operations. - Camera Setup:
The app shows how to configure both front and rear cameras using theAVCaptureDevice. It handles switching between the cameras, adjusting focus, exposure, and white balance settings.AVCaptureDeviceInputadds the camera input into the session. - Real-Time Preview:
One of the key features of AVCam is the real-time camera preview usingAVCaptureVideoPreviewLayer. The preview layer is integrated into the UI, providing users a live feed from the camera, and scales according to device orientation and screen size. - Capturing Photos:
The app demonstrates photo capture via theAVCapturePhotoOutput. This includes configuring photo settings such as flash, HDR, and exposure adjustments before taking a picture. The app also includes code for handling photo captures asynchronously to ensure smooth user experiences. - Recording Videos:
AVCam can also record videos usingAVCaptureMovieFileOutput. The app handles starting and stopping video recordings, saving captured videos to the photo library, and managing recording quality and settings. - Session Management:
The app efficiently manages the lifecycle ofAVCaptureSession. It starts and stops the session appropriately when the app becomes active or inactive, saving power and resources. It also handles errors and gracefully resumes the session if necessary. - Device Configuration and Permissions:
AVCam addresses essential camera permissions and configurations, ensuring the app has access to the camera and microphone. The app integrates user prompts for granting camera permissions viaNSCameraUsageDescriptionin theInfo.plistfile. - Advanced Camera Features:
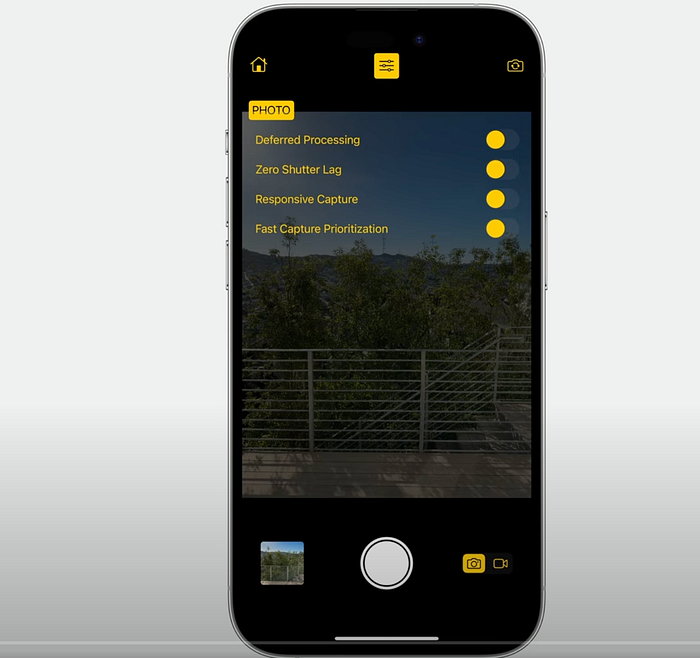
The sample can be extended to include features such as Deferred Photo Processing, Zero Shutter Lag, and Video Effects from iOS 17 APIs, though the basic sample does not incorporate these by default. These features can be added by utilizing advanced AVFoundation configurations.
There are several reasons why specific features or functionality in the AVCam app, as described in the documentation, may be tied specifically to iOS 18:
- New API Introductions:
iOS 18 introduces new APIs or enhancements that build upon the camera capabilities from earlier versions, such as improved Deferred Photo Processing, Zero Shutter Lag, and Video Effects and Reactions. These APIs are unavailable in earlier iOS versions, making their use exclusive to iOS 18 and above. For example, Zero Shutter Lag allows capturing frames even before the shutter button is pressed, which requires deeper integration with the camera’s hardware and is only supported on newer versions of iOS. - Responsive Capture Enhancements:
iOS 18 adds enhancements to the Responsive Capture APIs, improving performance and responsiveness for capturing media. These optimizations are dependent on system-level updates only available in iOS 18, allowing smoother, faster media capture even in high-motion situations. - Backwards Compatibility and Deprecations:
In iOS 18, certain features from older versions, such as the use ofvideoOrientation, are deprecated, requiring migration to new properties likevideoRotationAngle. These changes enforce compatibility with newer systems, ensuring the app takes advantage of the latest optimizations and avoiding deprecated functionality from iOS 17 and below. - Multi-Camera Features:
iOS 18 might further extend the AVCaptureMultiCamSession, adding new functionalities that support capturing from multiple cameras simultaneously. Although AVCaptureMultiCamSession was available in earlier versions, iOS 18 could introduce more refined control, better hardware utilization, or additional camera features.
In summary, the use of iOS 18 features in AVCam ensures access to these new capabilities and optimizations that improve user experience and take advantage of the latest hardware
Extending the Sample
AVCam provides a solid foundation for further customization. Developers can integrate additional features like Zoom Control, HDR, and Depth Capture, leveraging newer iOS APIs to enhance functionality.
For full documentation and sample code, you can visit the official page here.

AVFoundation
AVFoundation, the core framework that provides all the necessary classes and methods for managing media capture and playback (photos, videos, audio, etc.).
Key Frameworks and Components:
AVFoundation: The primary framework that handles camera, microphone, and media-related functionalities. It includes classes like:
- AVCaptureSession: Manages the flow of data from input devices (camera, microphone) to outputs (preview layer, file outputs).
- AVCapturePhotoOutput and AVCaptureMovieFileOutput: Handle photo and video capture, respectively.
CaptureService: While not a framework, it is the main actor responsible for integrating with AVFoundation to manage sessions and operations in an organized, asynchronous manner.
In short, while CaptureService is important within the structure of the app, the AVFoundation framework is the most critical piece, as it provides the essential tools for media capture and processing.
CaptureService
CaptureService is one of the most important parts of the code in the AVCam sample app. It serves as the backbone of the app’s media capture functionality by managing the entire capture pipeline, including the following key responsibilities:
Session Management: It coordinates the AVCaptureSession, setting up inputs (camera, microphone) and outputs (photo, video), ensuring smooth capture operations.
Asynchronous Operations: The CaptureService actor handles camera tasks asynchronously, making sure these operations don’t block the main thread, which is crucial for maintaining UI responsiveness.
Photo and Video Capture: It delegates the actual capturing of photos and videos to dedicated objects like PhotoCapture and MovieCapture, streamlining the process of switching between media types.
Device Management: It manages switching between front and rear cameras, handles rotations, and adjusts focus and exposure automatically.
CaptureService is the critical layer of abstraction that ties everything together in a structured, asynchronous way, making it one of the most important parts of the app. It depends on AVFoundation for the underlying functionality.
CaptureService, an actor that manages the interactions with the AVFoundation capture APIs.- handling of those operations to the app’s
PhotoCaptureandMovieCaptureobjects, respectively. - Calls don’t occur on the main thread
Configure a Capture Session
The central object in any capture app is an instance of AVCaptureSession.
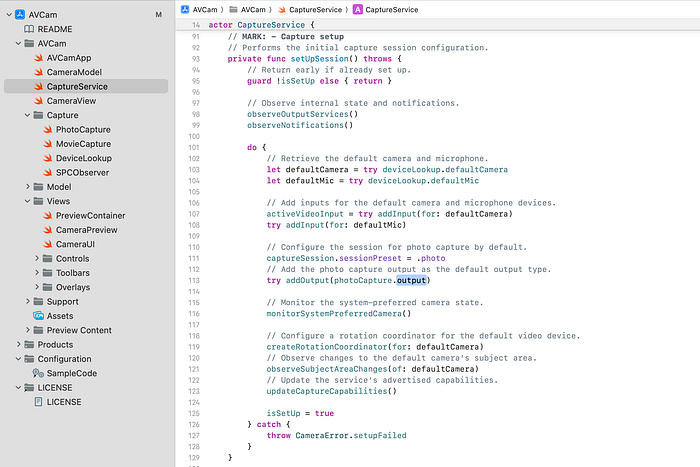
The capture service performs the session configuration in its setUpSession()
// MARK: - Capture setup
    // Performs the initial capture session configuration.
    private func setUpSession() throws {
        // Return early if already set up.
        guard !isSetUp else { return }

        // Observe internal state and notifications.
        observeOutputServices()
        observeNotifications()

        do {
            // Retrieve the default camera and microphone.
            let defaultCamera = try deviceLookup.defaultCamera
            let defaultMic = try deviceLookup.defaultMic

            // Add inputs for the default camera and microphone devices.
            activeVideoInput = try addInput(for: defaultCamera)
            try addInput(for: defaultMic)

            // Configure the session for photo capture by default.
            captureSession.sessionPreset = .photo
            // Add the photo capture output as the default output type.
            try addOutput(photoCapture.output)

            // Monitor the system-preferred camera state.
            monitorSystemPreferredCamera()

            // Configure a rotation coordinator for the default video device.
            createRotationCoordinator(for: defaultCamera)
            // Observe changes to the default camera's subject area.
            observeSubjectAreaChanges(of: defaultCamera)
            // Update the service's advertised capabilities.
            updateCaptureCapabilities()

            isSetUp = true
        } catch {
            throw CameraError.setupFailed
        }
    }
and add input / output and set current video input.
    // Adds an input to the capture session to connect the specified capture device.
    @discardableResult
    private func addInput(for device: AVCaptureDevice) throws -> AVCaptureDeviceInput {
        let input = try AVCaptureDeviceInput(device: device)
        if captureSession.canAddInput(input) {
            captureSession.addInput(input)
        } else {
            throw CameraError.addInputFailed
        }
        return input
    }

    // Adds an output to the capture session to connect the specified capture device, if allowed.
    private func addOutput(_ output: AVCaptureOutput) throws {
        if captureSession.canAddOutput(output) {
            captureSession.addOutput(output)
        } else {
            throw CameraError.addOutputFailed
        }
    }

    // The device for the active video input.
    private var currentDevice: AVCaptureDevice {
        guard let device = activeVideoInput?.device else {
            fatalError("No device found for current video input.")
        }
        return device
    }
To enable the app to capture photos, it adds an AVCapturePhotoOutput instance to the session.
Setup capture preview
The provided code defines a SwiftUI view (CameraPreview) that integrates with the AVFoundation framework to display a real-time camera feed using AVCaptureSession. Here's a short overview of the key components:
CameraPreview Structure:
- The
CameraPreviewis a SwiftUI view that usesUIViewRepresentableto wrap aUIViewin SwiftUI. - It takes a
PreviewSourceobject as input, which supplies the capture session (camera feed).
PreviewView Class:
- This class is a subclass of
UIViewand acts as the container for the camera preview. - It uses
AVCaptureVideoPreviewLayerto display the live camera feed. - If the code is running in a simulator (checked using
#if targetEnvironment(simulator)), a static image is displayed because camera functionality is unavailable in the simulator.
PreviewSource Protocol:
- This protocol defines a method to connect a camera session to a view (
PreviewTarget), ensuring that the camera feed can be sent to thePreviewView.
DefaultPreviewSource:
- This struct implements
PreviewSourceand connects an instance ofAVCaptureSessionto aPreviewView, allowing the live camera feed to be displayed.
Overall, the code is responsible for setting up and managing a live camera preview in a SwiftUI interface using AVFoundation.
import SwiftUI
@preconcurrency import AVFoundation

struct CameraPreview: UIViewRepresentable {

    private let source: PreviewSource

    init(source: PreviewSource) {
        self.source = source
    }

    func makeUIView(context: Context) -> PreviewView {
        let preview = PreviewView()
        // Connect the preview layer to the capture session.
        source.connect(to: preview)
        return preview
    }

    /// A class that presents the captured content.
    ///
    /// This class owns the `AVCaptureVideoPreviewLayer` that presents the captured content.
    ///
    class PreviewView: UIView, PreviewTarget {

        init() {
            super.init(frame: .zero)
    #if targetEnvironment(simulator)
            // The capture APIs require running on a real device. If running
            // in Simulator, display a static image to represent the video feed.
            let imageView = UIImageView(frame: UIScreen.main.bounds)
            imageView.image = UIImage(named: "video_mode")
            imageView.contentMode = .scaleAspectFill
            imageView.autoresizingMask = [.flexibleWidth, .flexibleHeight]
            addSubview(imageView)
    #endif
        }

        required init?(coder: NSCoder) {
            fatalError("init(coder:) has not been implemented")
        }

        // Use the preview layer as the view's backing layer.
        override class var layerClass: AnyClass {
            AVCaptureVideoPreviewLayer.self
        }

        var previewLayer: AVCaptureVideoPreviewLayer {
            layer as! AVCaptureVideoPreviewLayer
        }

        nonisolated func setSession(_ session: AVCaptureSession) {
            // Connects the session with the preview layer, which allows the layer
            // to provide a live view of the captured content.
            Task { @MainActor in
                previewLayer.session = session
            }
        }
    }
}
Request authorization
Before starting a capture session in the app, the system needs user authorization to access the device’s cameras and microphones. The isAuthorized property is defined asynchronously to check if the app has permission. It checks the authorization status using AVCaptureDevice.authorizationStatus(for: .video):
- If already authorized, it allows the capture session to proceed.
- If not yet determined, it prompts the user for permission via
AVCaptureDevice.requestAccess(for: .video).
If authorization is granted, the session starts; if not, an error message is displayed in the UI. This ensures the app complies with privacy requirements regarding camera and microphone access.
NOTE: The system groups video and photo capture under the same camera permissions. If a user grants access to the camera for video purposes, the app will also be able to take photos without needing separate authorization for image capture.
- Video authorization covers both video and photo capture.
- Photo authorization does not automatically grant permission for video capture.
- Microphone access requires separate permission if audio is involved.
In summary, one authorization for video access will suffice for both capturing images and videos but photo does not and both need separate mic access.
CaptureService
In the project the CaptureService is the workhorse
CaptureService actor manages a camera capture pipeline, handling AVCaptureSession, device inputs (like camera and microphone), and capture outputs for photos and videos in a Swift app.
Capture Session Management: It manages the camera’s capture session, handling both photo and video capture modes. The capture session is configured with inputs (camera, microphone) and outputs (for saving photos or videos).
Authorization Handling: It checks if the user has authorized camera and microphone access, prompting for permission if necessary.
Capture Modes: It supports switching between photo and video modes and adjusts the capture session’s configuration accordingly.
Preview Connection: The previewSource connects the camera feed to the preview UI in the app, using AVCaptureVideoPreviewLayer.
Device Selection: It allows switching between available cameras (e.g., front and back) and automatically monitors changes, such as when an external camera is connected.
Rotation Handling: It manages the rotation of the camera feed and updates the capture and preview layers to maintain the correct orientation.
HDR Video Support: If supported by the camera, it enables HDR video capture based on user settings.
Photo and Video Capture: It handles taking photos and starting/stopping video recordings, with proper configuration for each mode.
Focus and Exposure: The service also manages automatic focus and exposure, adjusting based on user input or changes in the scene.
This actor ensures all camera operations happen off the main thread to avoid blocking the UI, and it coordinates the various capture inputs, outputs, and settings needed for a responsive camera experience.

Capture a photo
Lets take a detailed look at capturing a photo.
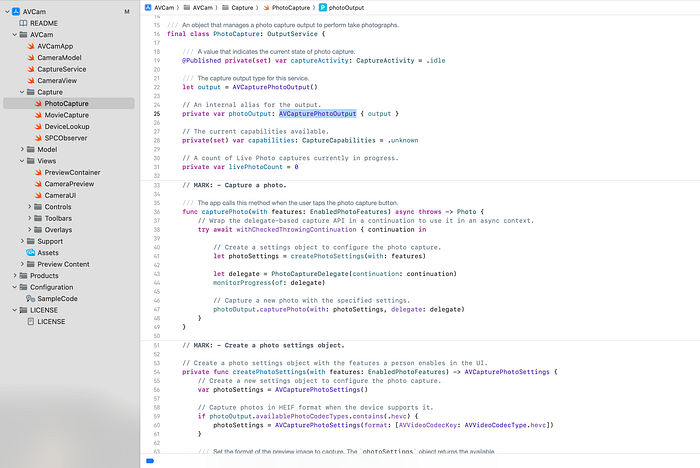
The CaptureService in the app delegates the task of photo capture to a PhotoCapture object, which manages an AVCapturePhotoOutput instance. The photo is captured using the capturePhotoWithSettings:delegate: method, which requires passing photo capture settings and a delegate to handle the photo capture process.
In an asynchronous context, the app uses withCheckedThrowingContinuation to wrap this delegate-based API into an async operation, allowing the app to await the photo capture process without blocking the main thread. Here’s a breakdown of the process:
Photo Capture Method:
- When the user taps the photo capture button, the app calls
capturePhoto(with: features). - Inside this method, a settings object is created to configure the photo capture, which can include enabling features like flash or HDR.
- A delegate (
PhotoCaptureDelegate) is set up to handle the capture events. - The app then instructs AVCapturePhotoOutput to capture a photo using the specified settings.
Async Delegate Wrapping:
- The app uses
withCheckedThrowingContinuationto turn the delegate-based API into anasyncfunction. - When the capture is complete, the delegate’s
captureOutput:didFinishCaptureForResolvedSettings:error:method is called by the system. - If an error occurs during capture, the continuation throws the error.
- If successful, the captured photo is returned through the continuation.
Delegate Handling:
- The delegate monitors the progress of the photo capture.
- Once the capture is complete, the delegate resumes the continuation, either returning the captured photo or handling any errors.
Key Steps in the Delegate:
- If an error occurs during the capture, the delegate calls
continuation.resume(throwing:)to propagate the error. - If successful, a
Photoobject is created and returned viacontinuation.resume(returning:).
This approach enables the app to handle photo capture asynchronously, ensuring smooth operation without blocking the user interface, and allows for integration with Swift concurrency.
For further details on capturing photos, refer to Apple’s Capturing Still and Live Photos documentation.
Recording a Video
Recording a video with AVCaptureMovieFileOutput is conceptually similar to capturing a photo, but there are key differences due to the nature of continuous video capture. Here’s a breakdown of the similarities and differences:
Similarities
Delegate-Based API:
Both photo and video capture use delegate-based APIs to manage the capture process.
- For photos:
AVCapturePhotoOutput.capturePhoto(with:delegate:) - For videos:
AVCaptureMovieFileOutput.startRecording(to:recordingDelegate:)
Continuation Wrapping:
Just like photo capture, the video recording process can be wrapped in an async context using withCheckedThrowingContinuation to handle the delegate callbacks asynchronously.
Error Handling:
Both photo and video capture use a delegate method to handle the result, either resuming with a captured output (a photo or movie object) or throwing an error if something goes wrong.
Differences:
Start/Stop Mechanism:
For video, you need to start and stop recording explicitly:
- Start:
startRecording(to:recordingDelegate:) - Stop:
stopRecording()
In contrast, for photos, the capture is instantaneous with a single capturePhoto call.
File Storage:
Video capture requires specifying a file URL to save the output, whereas photo capture typically uses a memory buffer before saving the image data.
Continuous Monitoring:
During video capture, the app typically monitors the recording duration or updates the UI (e.g., showing the elapsed recording time). This is not necessary for photo capture, which is a single event.
Handling Larger Data:
Videos produce much larger files compared to photos, so managing file sizes, compression, and storage locations is more critical in video capture.
Summary of Video Capture Process:
Start Recording:
The app checks if recording is already in progress, then starts a timer to monitor the recording duration and begins recording by calling startRecording.
Stop Recording:
When the user stops the recording, the app calls stopRecording. The system then invokes the delegate’s fileOutput(_:didFinishRecordingTo:from:error:) method, which either returns the captured movie or throws an error.
In short, while both processes are similar in their use of delegates and async wrappers, video capture involves continuous operation, file storage, and explicit start/stop control, whereas photo capture is a single, instant event.
Conclusion
The AVCam sample app provides a comprehensive guide for developers to build robust photo and video capture features on iOS using the AVFoundation framework. With the latest advancements introduced in iOS 18, such as Zero Shutter Lag, Deferred Photo Processing, and Responsive Capture APIs, creating photo apps has become more powerful and efficient. These features enable faster capture, reduced lag, and real-time video effects, enhancing both user experience and app performance.
By leveraging the CaptureService actor, developers can manage AVCaptureSession, handle camera permissions, switch between photo and video modes, and integrate with Swift concurrency for seamless async operations. The app’s flexibility allows developers to extend its functionality, making use of advanced features like HDR, Zoom Control, and multi-camera support.
For full documentation and code, visit Apple’s official AVCam: Building a Camera App page.
Now let’s look at Zero Shutter Lag, Deferred Photo Processing, and Responsive Capture APIs.
A Comprehensive Guide to Building a Responsive Camera Experience in iOS 17
With iOS 17, Apple introduced several cutting-edge APIs that significantly improve the camera experience for users and developers alike. These new APIs, integrated into the AVFoundation and PhotoKit frameworks, focus on delivering higher-quality photos, reducing shutter lag, and enabling real-time interactivity with video effects. In this article, we will explore the key concepts discussed in Apple’s session titled “Create a More Responsive Camera Experience” and delve into the AVCam project that demonstrates these APIs in action.
1. Introduction to the New Camera APIs
Apple’s new camera APIs in iOS 17 focus on improving three crucial aspects of photography:
- Deferred Photo Processing: Capture more photos quickly by deferring image processing.
- Zero Shutter Lag: Eliminate delays in capturing action shots.
- Responsive Capture: Capture multiple images back-to-back for fast-paced scenarios.
- Video Effects and Reactions: Add interactive effects such as hearts, thumbs-up, and confetti to videos in real-time.
All of these improvements empower developers to create responsive camera experiences for high-action environments, such as sports photography, or even playful social media interactions.
2. Deferred Photo Processing
Deferred photo processing allows you to capture high-quality photos rapidly by deferring the final processing to a later stage. This means that while users can continue taking photos, the camera outputs a “proxy” image, which is then replaced with a fully processed image when convenient.
How It Works:
- The capture session delivers a proxy photo via the
didFinishCapturingDeferredPhotoProxydelegate. - The photo is stored as a placeholder in the library, allowing another capture immediately.
- The system processes the image in the background or when the device is idle.
This approach is especially useful for scenarios where you need to capture multiple photos quickly, like in burst mode.
Code Example:
To enable deferred processing, you must configure your AVCapturePhotoOutput object:
let photoOutput = AVCapturePhotoOutput()
if photoOutput.isAutoDeferredPhotoDeliverySupported {
    photoOutput.isAutoDeferredPhotoDeliveryEnabled = true
}
Once a photo is captured, handle the proxy photo:
func captureOutput(_ output: AVCapturePhotoOutput, didFinishProcessingPhoto photo: AVCaptureDeferredPhotoProxy) {
    // Handle the deferred photo proxy
    // Save proxy to the photo library for later finalization
}
This implementation allows users to keep taking photos without waiting for processing to complete.
3. Zero Shutter Lag
Shutter lag is the delay between the user pressing the capture button and the camera capturing the image. With zero shutter lag, iOS 17 eliminates this problem by maintaining a buffer of past frames, allowing the camera to “travel back in time” and capture the exact frame the user wanted.
How It Works:
- A ring buffer captures a series of frames continuously.
- When the user taps the shutter button, the camera grabs the frame from the buffer that matches the moment the button was pressed.
- The result is an image that accurately reflects the viewfinder at the time of capture, with no lag.
Code Example:
Zero shutter lag is enabled by default for apps targeting iOS 17. To check if the device supports it:
if photoOutput.isZeroShutterLagSupported {
    photoOutput.isZeroShutterLagEnabled = true
}
Zero shutter lag is crucial for action photography, such as capturing sports events, wildlife, or any fast-moving subjects.
4. Responsive Capture APIs
The Responsive Capture APIs enhance the speed at which multiple images can be taken. These APIs allow for overlapping capture phases, meaning the app can start capturing a new photo while the previous photo is still being processed.
How It Works:
- As soon as the capture phase of a photo completes, the system starts processing the photo.
- During the processing phase, another capture can begin without waiting for the current photo to finish processing.
This is especially useful for situations where users need to take multiple shots in quick succession, such as at a sports event.
Code Example:
if photoOutput.isResponsiveCaptureSupported {
    photoOutput.isResponsiveCaptureEnabled = true
}
Enabling this API can increase memory usage, but it dramatically improves the shot-to-shot time, making the app much more responsive.
5. Video Effects and Reactions
Starting with iOS 17, Apple introduced Reactions, a playful way to interact with videos. These effects can be triggered through gestures or programmatically and include hearts, balloons, confetti, and more.
Gesture-Based Reactions:
Users can perform gestures like thumbs-up or victory signs to trigger corresponding video effects, such as balloons or confetti, adding an extra layer of interactivity to live videos or video calls.
Programmatic Reactions:
Developers can trigger these effects using the AVCaptureDevice.performEffect method:
if device.canPerformReactionEffects {
    device.performEffect(for: .thumbsUp)
}
This feature is a fun addition to apps where video engagement is essential, such as video conferencing or social media platforms.
6. Implementing the Features: AVCam Project
Apple’s AVCam sample project provides a hands-on demonstration of these new APIs. The project shows how to set up an AVCaptureSession and configure the capture output for photos and videos. Below is an overview of how these APIs are integrated into the project.
Setting Up the Capture Session:
let session = AVCaptureSession()
session.sessionPreset = .photo
guard let camera = AVCaptureDevice.default(.builtInWideAngleCamera, for: .video, position: .back) else {
return
}do {
let input = try AVCaptureDeviceInput(device: camera)
session.addInput(input)
} catch {
print("Error setting up camera input: \(error)")
}
Enabling Deferred Photo Processing:
let photoOutput = AVCapturePhotoOutput()
if photoOutput.isAutoDeferredPhotoDeliverySupported {
    photoOutput.isAutoDeferredPhotoDeliveryEnabled = true
}
session.addOutput(photoOutput)
Enabling Zero Shutter Lag and Responsive Capture:
if photoOutput.isZeroShutterLagSupported {
    photoOutput.isZeroShutterLagEnabled = true
}
if photoOutput.isResponsiveCaptureSupported {
photoOutput.isResponsiveCaptureEnabled = true
}Handling Reactions in Video Capture:
if device.canPerformReactionEffects {
    device.performEffect(for: .thumbsUp)
}
The AVCam project is a great starting point for developers looking to implement these powerful new features into their camera apps.
7. Conclusion
With the introduction of deferred photo processing, zero shutter lag, and responsive capture APIs, iOS 17 offers developers the tools they need to create faster, more responsive camera apps. These features not only improve the user experience by allowing rapid-fire shots and reducing lag but also offer fun and interactive ways to enhance video content with effects like reactions.
By utilizing the AVCam sample project and the detailed code examples provided by Apple, developers can quickly implement these new features to offer cutting-edge camera functionality in their apps.
As camera technologies continue to evolve, these features will play a crucial role in providing high-quality, real-time, and interactive photography and video experiences on iOS. Whether you’re building a professional camera app or a playful social media tool, these APIs open up new possibilities for enhancing how users capture and interact with media.
I hope this article gives you a comprehensive understanding of the new iOS 17 camera APIs and how to implement them using Apple’s AVCam project. Let me know if you need more details or further code explanations!
Summary
The AVCam: Building a Camera App documentation on Apple’s developer website is a detailed guide that helps developers build a fully functional camera app using the AVFoundation framework. This sample app shows how to manage camera settings, capture photos and videos, and perform real-time camera previews on iOS devices.
iOS 18-Specific Features:
Several features introduced in iOS 18 enhance the camera experience, which are exclusive to this version due to API availability:
- Zero Shutter Lag: Captures frames before the shutter is pressed, reducing delay.
- Deferred Photo Processing: Allows faster photo capturing by deferring processing.
- Video Effects and Reactions: Enables adding real-time effects (e.g., confetti) during video capture.
- Responsive Capture Enhancements: Improves performance when capturing media in high-motion scenarios.
Key Components:
- AVCaptureSession: Manages the flow of data between input devices (camera, microphone) and output devices (preview layers, file outputs), ensuring smooth operation.
- Camera Setup: Configures front and rear cameras, managing focus, exposure, and white balance. It uses
AVCaptureDeviceInputto add the camera to the session. - Real-Time Preview: Uses
AVCaptureVideoPreviewLayerto provide a live feed from the camera, which scales based on the device’s orientation. - Photo and Video Capture: Handles photo capture via
AVCapturePhotoOutputand video capture viaAVCaptureMovieFileOutput. - Session Management: Manages starting and stopping of sessions, handling power and resource management efficiently.
- Device Configuration and Permissions: Manages camera and microphone access and configures permissions through
NSCameraUsageDescription.
Advanced Camera Features:
AVCam can be extended to include features like Zoom Control, HDR, and Depth Capture using newer iOS APIs. Developers can integrate additional capabilities such as Deferred Photo Processing, Zero Shutter Lag, and Video Effects to further improve functionality.
For full documentation and sample code, visit the official Apple Developer AVCam documentation.
CaptureService Overview:
The CaptureService actor manages the camera pipeline, including the configuration of inputs and outputs, using AVCaptureSession. It handles tasks such as:
- Session Management: Configuring and managing the capture session, switching between photo and video modes.
- Authorization Handling: Checking for and requesting camera permissions.
- Preview Connection: Establishes the connection between the camera and the UI for real-time preview.
- Device Selection and Rotation: Allows switching between available cameras and manages video feed rotation for proper orientation.
- HDR Video Support: Enables HDR video capture if the device supports it.

Multi-Camera
If you can … use both cameras at the same time …
You must run this sample code on one of these devices: An iPhone (11) / iPad Pro (8th) with an A12 or later processor.
Simultaneously record the output from the front and back cameras into a single movie file by using a multi-camera capture session.


